As a continuation from the SharePoint Intranet Introduction, you may have been assigned the task of overseeing your department's content on the SharePoint intranet (AKA MyFramingham).
Please note, the creating a MyFramingham site is optional. If your department doesn't have a site already, you are welcome to join at anytime. ITS will create the site and provide you access to edit/add your department's content. Once you have completed your site, please reach out to ITS to perform the readiness review. Once the readiness review has been completed, ITS will add your department site to the global navigation and provide access to the campus community.
To get a site created for your department, or to initiate a readiness review, please reach out using this service. If you need access to your departments site, please fill out this form.
Please note, as a content editor you are responsible for ensuring the content on your department's site accurate, up to date, and accessible. This will likely require periodic checks of your site. ITS recommends you check the pages, links, and to run the accessibility assistant per site page at least once a semester.
This article contains the following topics:
- Managing content
- Uploading documents
- Creating documents
- Managing documents
- Editing your department's home page
- Creating new site pages
- Building your new page
- Creating and customizing sections
- Adding web parts
- Moving sections or web parts
- Accessibility
- Editing your department's site navigation
- Restoring to a previous version
- Previewing your site in a mobile view
- How to get more help
In addition to the content provided in the text below, the following resources are attached to this article.
- "SharePoint Site Building"- PowerPoint presentation from the live training sessions
- "Home Page Layout"- Picture of the department template layout with web part descriptions
Keep in mind, once you add documents to your site, it will be viewable by the campus community and may show up in a Search. Periodically check the documents within your site contents to confirm they are up-to-date.
Uploading documents
Please note, prior to uploading documents, please confirm they meet accessibility standards using the application's accessibility checker. To upload your files or folder, please follow these instructions:
- When you are in your department's SharePoint intranet page, click on the settings (gear icon) at the top right of the page and click Site Contents

- Once you are in Site Contents, click Documents

- When you are in Documents, click Upload in the toolbar and then click Files or Folder

- Locate the files or folder on your computer
Creating New Documents
In addition to uploading content, you can also create Microsoft documents within SharePoint. You will only create documents with this method if you intend the document to be published to internal audiences.
- When you are in your department's SharePoint intranet page, click on the settings icon at the top of the page and click Site Contents

- Once you are in you site contents, click Documents

- Once you are in Documents, click New and select one of the Microsoft products

Managing Documents
Once your documents have been added, you will have more management actions to chose from.
-
When you are in your department's SharePoint intranet page, click on the settings icon at the top of the page and click Site Contents
- Once you are in you site contents, click Documents
- If you would like to delete, manage permissions, download, rename, etc. click the three dot icon when the document is selected

If you don't have access to your site already, please contact ITS. Once you have access, you will have the ability to edit your department's home page. Please note, your current homepage reflects our department template. We are aiming to maintain a consistent look and feel across department home pages to ensure a cohesive intranet experience. Before receiving access to your site, ITS will set up your home page with the department template. You will only be responsible for editing the existing web parts that are in place.
To begin editing, click the Edit button towards the top right of the screen.

When you are in edit mode, click the web part you would like to change. Each web parts works a little bit differently. Please see the hyperlinks below to learn how to use each.
Your home page consists of the following web parts, which are the building blocks to your departments SharePoint site:
- Text
- Adds paragraphs and tables to your page. Formatting options like styles, bullets, indentations, highlighting, and links are available.
- Hero
- A great way to bring focus and visual interest to your page. Use compelling images, text, and links to draw attention to each
- Quick Links
- "Pins" items to your page for easy access.
- Events
- Allows you to add and display upcoming events on your page. You can even include a map with location, online meeting information, and more.
- People
- Displays a selected group of people and their profiles on your page. It can be used for contact information, team information, presenters, and more.
Depending on the needs for your site, you can remove certain web parts like the Events or People web part. Additionally, if your department does not have a public facing office, you may remove the text web part that displays contact information, and utilize that space for more quick links or a different web part,
An additional point to keep in mind is accessibility. Please follow this Microsoft article that gives some pointers about keeping your page accessible.
In the attachments of this article, you can find an image of the department template with descriptions of the web parts.
If you would like to watch video instructions for editing your home page, please see this video.
Once you have finished editing your department's home page, you may decide that you want to create additional pages for specific topics. For example, you could create a specific page that lists the members of your teams, or you could create new pages for specific resources or services. To create a new page, you have two different methods:
-
Click the New button under your department's title, then click New Page

- Click the gear icon at the top right of the page, then click Add a Page

Both of these methods will give you the option to chose a blank, visual, or text template. Chose Blank.

Then on the next screen, you will have a blank slate to work from.
Building out your new page is where you can be more creative with the layout. You do not need to stick to using the department homepage template and will have the freedom to customize columns and add any web parts that are available to you. Once you have created your new site page, you will be able to play around with web parts to display the information you need.
Adding and Customizing Sections
- To begin customizing your new page, click the Edit button
- Once in Edit mode, your page will look like the image below with a full width title section, and a section with a Text web part already added.

- Clicking on the web part will make the options appear. You may choose to edit these sections using the options toolbar, or begin typing directly into them. If you would like to change the style of the title, you can click the "Overlap" drop down. The page will also show you as the author automatically to whoever will be viewing the page. You can click on your name under the title and the "X" button to remove yourself

- I, the section under the title, you have the ability to change the amount of columns, the background shading, or making the section collapsible. Click on the section to make the tool bar appear at the top, and click the "Edit Properties" option
- On the pane that appears on the right, you will have the option to change the layout options, the background shading, and if you want to make the section collapsible

- If you would like to add a new section, use the black + icon in between or beneath existing sections

Adding Web Parts
Once you have your section set up, you will want to begin playing with web parts. To add a web part to a section, hover over the top center of the column and click the grey plus icon that appears

This will give you a list of web parts to choose from, like Text, Quick Links, Hero, Image web part etc. You can find a list of web parts and how to apply them using this Microsoft article.
Moving Sections or Web Parts
Once your sections and web parts are set up, you can move them around your page.
To move sections, click on the section to make the menu toolbar appear. Click and drag the "Move section" option to the desired location

To move web parts, you have two options. Hover your cursor over the web part until the cursor turns into a move icon. If that option does not work, click into the web part for the menu at the top to appear. Click the and drag the "Move web part" option to the desired location

The SharePoint Pages Authoring Accessibility Assistant is a tool designed to help ensure that SharePoint pages meet accessibility standards. This tool provides checks and brief guidance to ensure pages are inclusive and accessible to a broad audience.
Reminder: ITS recommends to confirm your document meets accessibility standards prior to uploading. The steps below are for confirming your site pages meet accessibility standards.
-
While in Edit mode, open the right toolbar.
-
Click on Accessibility Assistant to initiate the scan.
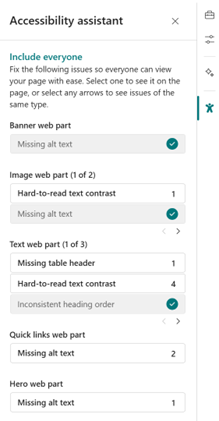
Check marks show where the content passed all checks where numbers show where you have an opportunity to improve the accessibility of your page.
Accessibility Assistant works today on the following page elements:
-
Text web part
-
Image web part
-
Quick links web part
-
Hero web part
-
Banner web part
Accessibility Assistant performs below checks:
-
Page structure (e.g. inconsistent heading order)
-
Missing alt-text
-
Blank links
-
Tables (e.g. missing table header)
-
Color and contrast (hard-to-read text contrast)
To resolve an issue:
-
Click on the issue card to open the content pane or locate to the issue area on canvas for that specific web part content.
-
Follow the recommendations or use the provided options to fix the accessibility issue.

Note: Clicking 'I fixed it' means the color contrast issue has been marked as resolved and will not be detected again during this session. Clicking 'Ignore' skips the issue and returns to the previous state.
3. Once the issue is resolved, the counter for remaining issues will update, and the focus will move to the next instance of violation.
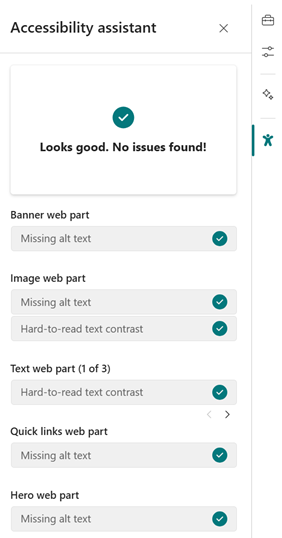
4. When there’s no issue detected or all issues have been fixed, the ‘Looks good’ messaging will show up.
In addition to global navigation, your department's SharePoint has its own site navigation. This is only visible on your site page, and you can choose to include links to your internal SharePoint pages or external sites. Your site navigation is located directly below your site title.

To edit your site navigation, please follow these instructions:
- Click Edit within your site navigation

- An edit pane will appear on the left. To add a navigation option, hover underneath or above an existing option until you see a plus icon

- Once you click the plus icon, you can add a link or label option. A link would be inputted as a web address, while a label is a non-hyperlinked text option. If you use the label option, you will want to utilize sub links

- Once you add a navigation option, you will have the ability to click the three-dot icon [...] to see the options Edit, Move Up, Move Down, Make sub link, or Remove. Edit will allow you to change the navigation type, URL, and display name. Move up or Move down will change the order in which the option appears within your site navigation. Make sub link will allow the navigation option to appear as a drop down to the option above it. Lastly, Remove will remove the option from your site navigation.

- Once you have edited your site navigation, click the Save or Cancel button
If you would like to watch video instructions for site navigation, please see this video.
If you decide you like a previous version of your site after saving the draft or republishing, SharePoint allows you to compare and restore your site back to a previous version.
- On your site page, click the Page Details button right under your site navigation

- A pane will appear on the right, click Version History at the bottom of the pane

- This pane will tell you who has updated the article. Click on the three-dot icon [...] to compare with the selected version or restore

- Once you click Restore, the changes are applied, and you can click the X at the top to exit the version history pane.
As you are working on your site you may want to view how your site would look on a mobile device. Under your site's title, there is a "Preview" option in SharePoint in either Edit mode, or on the published page

Once you click on "Preview" you can switch between Desktop and Mobile.

ITS is here to help!
To get access to your department's SharePoint site, quick questions, or once you are ready for ITS to perform the readiness review, you may put in a ticket using this service. We welcome all questions.