Overview
Panopto Capture allows a user to easily record audio, video, and screens or applications. A user can access Panopto Capture directly within their browser instead of downloading the desktop application.
Prerequisites
- Creator access to Panopto
- Latest version of Chrome, Firefox, and Edge.
1. Launch Panopto Capture
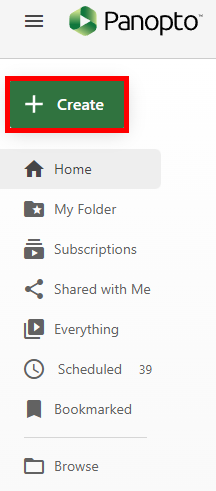
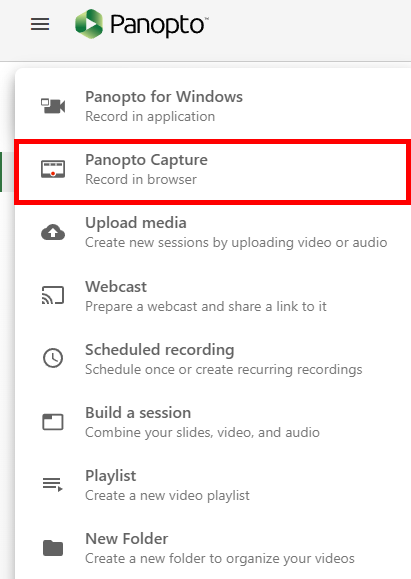
1.1. In the folder you want your video to record to, click on the Create button, located in the upper left corner of your Panopto site, and then select Panopto Capture. Note: If you launch Panopto Capture from your home page or the incorrect folder, you can change the location of the video during the upload process, as described in step 8.5. below, or from within your Panopto site.
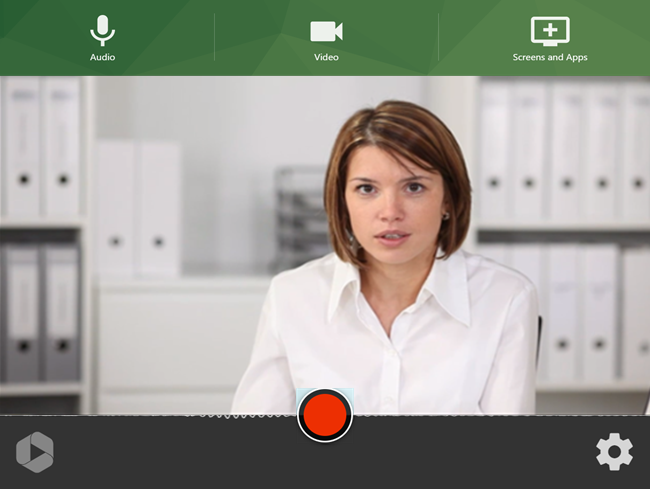
1.2. Panopto Capture launches in a new browser tab
2. Select a Microphone
Note: You may be prompted by your browser to give Panopto access to your microphone(s). If you accidentally block a device, please refer to our document How to Unblock a Device on a Browser for assistance.
2.1. If you want to use a different microphone from the one automatically chosen, select the microphone icon from the top toolbar.
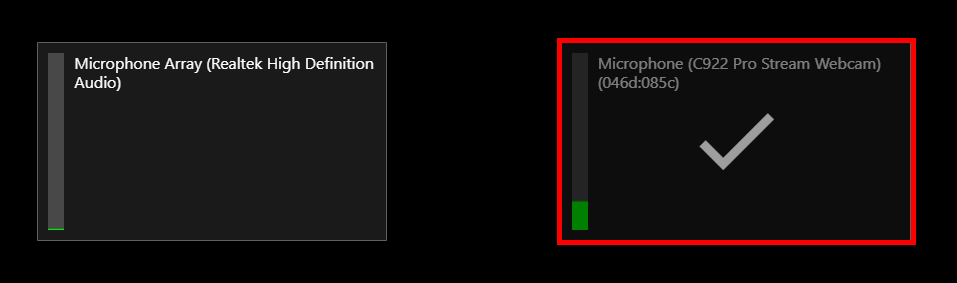
2.2. Each microphone connected to your computer will appear. Select the desired microphone, and a checkmark will appear over it.
If you would like to add or switch to a different audio source, hover over the audio source. The options to Switch or Add will appear over the audio source. Select which you'd like to do and proceed
3. Select Camera Sources
Note: You may be prompted by your browser to give Panopto access to your camera(s). If you accidentally block a device, please refer to our document How to Unblock a Device on a Browser for assistance.
3.1. If you want to use a different camera from the one automatically chosen, select the camera icon from the top toolbar.
3.2. Your connected cameras will appear and show a preview. Select the desired camera(s) and a checkmark will appear over the preview. Note: The first camera selected, automatically or manually, will be used as the primary video source. Secondary cameras will appear with the option to either switch to them for the recording or to add them as a secondary video source. To learn where these sources will appear in the viewer, please see Learn About the Features of the Video Viewer.

3.3. Blur and Virtual Background: You have the option to blur your background or add up to three virtual backgrounds to use while recording yourself. Hover over your camera feed. The No Background button will appear first). Select it to rotate through the following options:
- 3.3.a. Blur: The Blur button will appear first, and allows you to blur out your background). The speaker will still appear, but their background will become blurred out.
- 3.3.b. Virtual Background: The last virtual background you uploaded or used in Capture will appear as an option. The speaker will still appear, but their background will change to the uploaded image.
3.4. Smart Camera: Smart Camera automatically tracks and follows the speaker's face. The No Smart Camera icon will appear first. Select it to rotate through the following options. Please note: If you are using Safari, the options for Smart Camera and Background will not appear as they are not supported in Safari.

- 3.4.a. 1 Person: Smart Camera will track a single speaker in the video.
- 3.4.b. Group: Smart Camera will track a group of people.
3.5. Preview a source in full screen: hover over the preview of the source and click the full-screen icon.

3.6. Remove a video source: hover over the preview of the source and click the X icon.
3.7. Preview Your Camera while Recording: If you are using a full screen to capture an application or tab while also recording yourself, you can pop your camera feed out of the arrangement while recording to preview what you’ll look like in the final video. Note: if you are recording the entire screen, this preview will still be captured. This is only recommended when you are only capturing one application or tab in full screen.
3.7.a. Hover over your camera feed, and select the feeds icon:
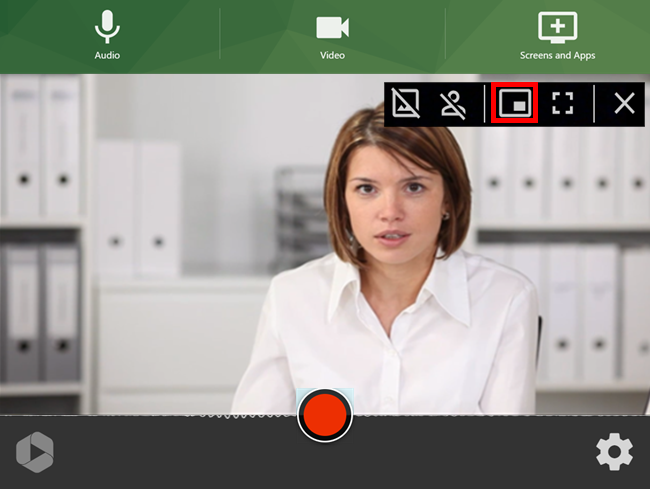
3.7.b. The preview of your camera feed will appear on top of your recorded application or browser tab (Fig. 13). Note: Your application or browser tab will not record with this image over it. This allows you to see yourself while you are recording, but will still record in your selected video arrangement.
4. Select Screen and Application Sources
Mac users, please note: Depending on the browser you are using, you may need to give additional permission for Chrome or Firefox to access your screen before recording a PowerPoint presentation. To learn more about this, please visit Why isn’t my screen being recorded on Mac when using Capture? Please note: When recording more than one secondary source, the source selected last will be displayed to viewers as a default.
4.1. To record a screen, application window, or individual browser tab, select the monitor icon:

4.2. Chrome or Edge (Chromium-based) users: a pop-up window will appear that allows you to select between a screen, application, or browser tab:
4.2.a. To record everything that happens on a screen, choose Your Entire Screen. Then, select the screen to record and click Share. Optionally, select Share Audio to add the audio from your computer to the recording. This is ideal for when you are recording a video call or any application that has sound. The Share Audio option is not available to macOS users on the Your Entire Screen tab.
4.2.b. Select the Application Window tab to record everything that happens in one application window only. Select the application and then click Share. Please note the following:
- For Windows users, after starting the recording, Panopto will record PowerPoint slides as a video stream when a presentation is put into slideshow mode.
- For Mac users, you will need to make sure the slideshow is started in the option under the screen in Capture. If you are a Firefox user, please see How to Record PowerPoint with Firefox and Capture.
- The Share Audio option is not available on the Application Window tab.
- Dropdown menus are not captured when sharing a webpage as an Application Window.
4.2.c. Select the Tab option, shown here in Chrome, to record everything that happens in one browser tab. Select the tab you want to record and click Share. Optionally, select Share audio to add the audio from the tab to the recording.
4.3. Firefox users: a permissions pop-up window will appear. To learn how to capture PowerPoint using Firefox, please visit How to Record PowerPoint with Firefox and Capture.
4.3.a. Select the drop-down menu Select Window or Screen to pick the window, application, or screen you want to share
4.4. After choosing one screen or application source, you may add additional sources by selecting the monitor icon again.
5. Recording the Video
Please note: The length of the recording is only constrained by the memory available to the browser as well as your network speed, as it uploads the video in parts as you record. A slower network speed means that the browser has to hold more information for individual pieces of video that have not yet been uploaded. Panopto Capture will upload at least 5MB in 10-second intervals. If there is less than 5MB of data for 10 seconds, Panopto will accumulate it and upload it once there is enough space. Typically, there is enough data every 10 seconds when recording with HD quality. SD/audio-only/screen captures have a lower bitrate and may record for 1+ minutes before accumulating enough data to upload.
5.1. To begin recording your video, click the red circle button at the bottom center of Panopto Capture:

5.2. If enabled, you will see a 5-second countdown on the screen, and then the recording will begin. During the countdown, you will also see the option to start recording immediately by pressing Enter or to cancel by pressing Escape (Esc).
5.3. To stop recording, select the red square button at the bottom center of Panopto Capture. The video will immediately begin to upload. Do not close the Panopto Capture browser tab until the upload is complete.
6. Video Upload and Processing
Please note: Panopto Capture uses failsafe recording, where your captured media is stored on the local file system using a database within the web browser. This means that even if your browser crashes or your computer turns off, your video will finish uploading the next time you launch Capture. Additionally, though Capture is uploading progressively in the background, it may still list the video as having no content in the folder view; however, once it is fully uploaded, the video will start processing and this will be reflected in the web UI. Panopto is working to implement upload progression status in the web UI.
6.1. Once you stop the recording, a new page will load that shows the video’s progress. Do not close this page until you see the message Getting your video ready for editing: It's safe to close your browser window in the top left corner. Once the video has been processed completely, it will state Your video is ready. Note: this video will upload to the folder that you were in when you opened Capture. If you do not have Creator access to that folder, it will upload to your My Folder. If you do not have a My Folder set up, it will upload to your most recently used folder.